Tuesday 2 July 2013

How to Enable Windows XP Routing ?

1st: NIC that directly connect to internet.
Other: NIC which will act just any other  interface of router holding other network.(It will also act as default gateway)
Lets take an example, see fig below,

In the figure as you can see there are 3 NIC one of which connects directly to Internet other two are used as router interface to create  different networks.Lets start,

First we have to enable IP forwarding, to do that
Go to Run> type regedit
then follow path  
HKEY_LOCAL_MACHINE\SYSTEM\CurrentControlSet\Services\TcpipParameters

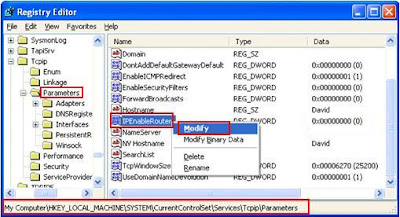
 Right click IPEnableRouter registry object, and click Modify

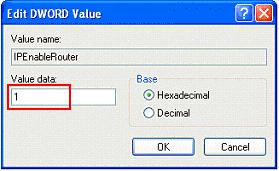
In the value data field enter 1. Its done click OK.

Now configure the network cards on the  XP machine (router) with following info, 
NIC-2
Network Card A (connect to network A):
IP: 10.10.10.1
Netmask: 255.255.255.0
Gateway (GW): [leave it blank]

NIC-3 
Network Card B (connect to network B):
IP: 192.168.20.1
Netmask: 255.255.255.0
Gateway (GW): [leave it blank]

NIC-1 
Network Card C (connect to Internet via cable/dsl connection)
This information will be based on the Internet connection service which you have subscribed. 

Configure all the computers in network A with following information.
Network A 
IP: 10.10.10.2-254
Netmask: 255.255.255.0
Gateway (GW): 10.10.10.1

Configure all the computers in network B with following information.
Network B 
IP: 192.168.20.2-254
Netmask: 255.255.255.0
Gateway: 192.168.20.1

How to Apply Windows XP Internet Sharing


I. Brief Introduction on Two Methods for Windows XP Internet Sharing

There're two methods to apply Windows XP Internet sharing - ICS (Internet Connection Sharing) service of Windows XP and proxy server. ISC is implemented by Microsoft as a feature of its Windows operating system however, there're many limitations and problems for this function such as -
  • ICS can be used for Internet sharing in XP, but it's designed for Windows operation system if other OS, it's hard to use ICS.
  • To use ICS for Internet sharing in XP, clients need to get IP addresses from DHCP, that means you can not specify IP addresses for clients manually.
  • Some certain activities will cause loss of ICS connectivity. For example, if clients disconnect the network cable, you need to restart ICS service to make clients connect again.
  • For both green hand and users who are even familiar with Windows OS and network, it's complex to apply Windows XP Internet sharing via ICS.
  • The flexibility and customization of ICS are worse than proxy server.
Considering the above lacks of ICS, we recommend proxy server for Windows XP Internet sharing. It's much easier than ICS and better in flexibility and controllability. There are many proxy server softwares which can be used to build proxy server for Windows XP Internet sharing, the most prominent superiority of CCProxy is that it's very smart and easy-to-use. Bellow are the steps to build a proxy server with CCProxy for Win XP Internet sharing.

II. Build Proxy Server with CCProxy for Windows XP Internet Sharing

  1. Choose a computer which is running Windows XP and connected to both the LAN and the Internet.
  2. Download the latest version of CCProxy from it's download center.
  3. Launch "ccproxysetup.exe" and keep clicking the "Next" button to finish installation. You do not need to make any additional configuration, CCProxy will work automatically for Windows XP Internet sharing.
Quick Start-1
Figure 1
To make CCProxy work well, you need to turn off the system firewall of Win XP or make an exception rule for CCProxy. Click Windows "Start" -> "Control Panel" -> "Security Center" -> "Windows Firwall" -> you can click "Off" check box to turn off Windows Firewall or keep it on as Figure 2.
XPfirewall-1
Figure 2
If you keep the Windows Firewall on, you need to create exception rule for CCProxy: click the "Exceptions" tab -> "Add Program" -> select CCProxy -> "OK" to save (Figure 3).
XPfirewall-2
Figure 3

III. Make Proxy Settings on the Client to Share Internet Access

After you have built proxy server om Windows XP, please make proxy settings on the client computers as bellow to make use of Windows XP Internet sharing.
Proxy server settings in IE
Click "Tools" -> "Internet Options" -> "Connections" -> "LAN Settings" -> select "Use a proxy server for your LAN" -> "Advanced", configure as bellow.
IE8 Proxy Setting
Figure 4
Proxy server settings in Firefox
Click "Tools" -> "Options" -> "Advanced" -> "Network" -> "Connections" -> "Settings" -> "Manual proxy configuration", configure as bellow.
Firefox Proxy Setting
Figure 5
Figure 6 shows shows surfing via Win XP Internet sharing after you have make proxy server settings in IE..
Share Internet Connection Yahoo
Figure 6
Besides IE and Firefox, you can get more instructions on proxy server settings for other network applications like MSN Messenger, Skype, CuteFTP etc.

Help With Network Commands Issue


It may be necessary to utilize utilities such as ping, winipcfg, tracert, etc to help identify and fix network related issues.
Solution

Below is a listing of the various network related commands used in MS-DOS, Windows, Linux, Unix, and other operating systems. Each command includes additional information to what the command does, the command's syntax, and miscellaneous information.

Note: If you are not the root or admin of a computer, it is possible for these commands to be disabled or revoked.

Arp
Finger
Hostname
Ipconfig
Pathping
Ping
Nbtstat
Net
Netstat
Nslookup
Route
Tracert and Traceroute
Whois
Winipcfg

ARP

Display or manipulate the ARP information on a network device or computer.

    See the arp command page for further help and information.

FINGER

The finger command available in Unix and Linux variants allows a user to find sometimes personal information about a user. This information can include the last time the user logged in, when they read their e-mail, etc... If the user creates a .PLAN or other related file the user can also display additional information.

    See the Unix and Linux finger command page for further information and help.

HOSTNAME

The hostname command displays the host name of the Windows XP computer currently logged into.

    See the hostname command page for further help and information.

IPCONFIG

Ipconfig is a MS-DOS utility that can be used from MS-DOS and a MS-DOS shell to display the network settings currently assigned and given by a network. This command can be utilized to verify a network connection as well as to verify your network settings.

Windows 2000 users should use this command to determine network information.

    See the ipconfig command page for further information and help.

PATHPING

Pathping is a MS-DOS utility available for Microsoft Windows 2000 and Windows XP users. This utility enables a user to find network latency and network loss.

    See the pathping command page for further help and information.

PING

Ping is one of the most commonly used and known commands. Ping allows a user to ping another network IP address. This can help determine if the network is able to communicate with the network.

    See the ping command page for further help on the MS-DOS and Windows command line command.
    See the Unix and Linux ping command page for further information on this command.

NBTSTAT

The nbtstat MS-DOS utility that displays protocol statistics and current TCP/IP connections using NBT.

    See the nbtstat command page for further help on this MS-DOS and Windows command.

NET

The net command is available in MS-DOS and Windows and is used to set, view and determine network settings.

    See the net command page for further information on this command.

NETSTAT

The netstat command is used to display the TCP/IP network protocol statistics and information.

    See the netstat command page for further help with this MS-DOS and Windows command.
    See the Unix and Linux netstat command for further help with this command.

NSLOOKUP

The nslookup MS-DOS utility that enables a user to do a reverse lookup on an IP address of a domain or host on a network.

    See the nslookup command page for further help on this MS-DOS and Windows command.
    See the Unix and Linux nslookup command page for further help with this command.
    Linux users may also be interested in the host command that performs a similar task.

ROUTE

The route MS-DOS utility enables computers to view and modify the computer's route table.

    See the route command page for further information and help with this command.

TRACERT and TRACEROUTE

The tracert command in MS-DOS and Windows or the traceroute command in Unix and Linux and variants is another commonly used network command to help determine network related issues or slowdowns. Using this command you can view a listing of how a network packet travels through the network and where it may fail or slow down. Using this information you can determine the computer, router, switch or other network device possibly causing your network issues.

    See the tracert command for further help with the MS-DOS and Windows command.
    See the Unix and Linux traceroute command for further help with this command.

WHOIS

The whois command available in Unix and Linux variants helps allow a user to identify a domain name. This command provides information about a domain name much like the WHOIS on network solutions. In some cases the domain information will be provided from Network Solutions.

    See the Unix and Linux whois command for further information on this command.

WINIPCFG

The winipcfg command available in Windows allows a user to display network and network adapter information. Here, a user can find such information as an IP address, Subnet Mask, Gateway, etc...

    See the winipcfg command for further information on this command.

Tip: Windows 2000, Windows XP and above users do not have winipcfg. Instead, use ipconfig.

PEER TO PEER NETWORKING IN WINDOWS


Windows 2K, 2003 and XP Peer to Peer Networking

1. Right Click My Network Places
2. Properties
3. Right Click Local Area Connection
4. Properties
5. Install
6. Client: Select Client for Microsoft Networks
7. Service: Select File and Printer Sharing for Microsoft Networks
8. Protocol: Select TCP/IP and NETBEUI (only 2K) XP and 2003 does not need NETBEUI
9. Right Click My Computer
10. Properties
11. Network Identification (2K) or Computer Name (XP/2003)
12. Properties (2K) or Change (XP/2003)
13. Computer name
14. Workgroup
15. Welcome to workgroup and restart PC
16. Log in as Administrator
17. Double Click My Network Places
18. Double Click Entire Network (2K) View Workgroup Computers (XP/2003)
19. Double Click Entire Contents (2K)
20. Double Click Microsoft Windows Network (2K)
21. Double Click Workgroup and find PC

How Share Folders in a Windows 2K/XP Networking environment
1. Double Click My Computer icon
2. Double Click the C: Drive
3. File>New>Folder>type name of folder
4. Right Click Folder>Sharing
5. Click on Share this folder and give it a share name
6. Apply
7. OK
8. (You will see a hand on the Folder that means it has been shared)
How to save a document in a shared folder
1. Start>Run>Notepad
2. Type something
3. File
4. Save
5. Save in (Click on arrow find the C drive and save it on appropriate shared folder)
6. Filename (Type the name of file to save)
7. Save
Normal Sharing permissions
Right click a folder>Sharing
Read- Can only read files and folder
Change- Can do anything with files or folders except deletion also cannot set policies
Full Control – Full access
Map a network drive to another computer in your network
Double click my network places
Double Click Entire Network (2K) View Workgroup Computers (XP/2003)
Double Click Entire Contents (2K)
Double Click Microsoft Windows Network (2K)
Double Click Workgroup and find PC
Right Click a folder or a drive you want to map
Map a network drive
Specify the drive letter for the connection and the folder that you want to connect to:
Finish
Double click my computer and connect to your map network drive


Win 9x Peer to Peer Networking


1. Right Click My Network Places (ME) or Network Neighborhood (98)
2. Properties
3. Click the Configuration TAB
4. Click Add
5. Click Add Client and install Client from Microsoft Network
6. Click Add Protocol and install Protocol from Microsoft pick NETBEUI for peer to peer networking.
7. Click Add Protocol and install the TCP/IP protocol in order to connect to the Internet
8. Click Add Service and select File and Printer sharing for Microsoft networks
9. Click File and Print Services from Configuration tab and check both boxes
10. Select Client for MS Networks as Primary Logon
11. Select Identification TAB and type the name of the computer, workgroup and description
12. Select Access Control TAB and select either Share or User level Access
13. Restart Computer
14. Log in with your account name type password if appropriate
15. Double Click My Network Places (ME) or Network Neighborhood (98)
16. Double Click Entire Network
17. View Entire Contents
18. Double Click Workgroup and find your PC

Share folders in win 9x
1. Double Click My Computer
2. Double Click the C: drive
3. File>New>Folder
4. Right Click Folder>Sharing
5. Click on Share this folder and give it a share name
6. Apply>OK
7. (You will see a hand on the Folder that means it has been shared)
How to save a document in a Shared Folder
1. Start>Run>Notepad
2. Type something
3. File
4. Save
5. Save in (Click on arrow find the C drive and save it on appropriate shared folder)
6. Filename (Type the name of file to save)
7. Save
Windows 9x supports share-level security; that is a password is assigned to a resource when the resource is shared

Read-Only: Allows users on the network to see and run applications in that folder, and to see and open files
Full: Allows all users on the network full rights including, read, creating, modifying and deleting files and folders
Depends on Passwords: Allows users to set different passwords for Read only or Full access you give the appropriate passwords to users based on their rights you want to give them

What is Networking ?

           In the world of computers, networking is the practice of linking two or more computing devices together for the purpose of sharing data. Networks are built with a mix of computer hardware and computer software.